

LWOTC - Squad Composition, Officers, and Bondmates
LWOTC - Squad Composition, Officers, and Bondmates
How I assemble squads throughout the campaign, along with some thoughts on officers and bondmates.

At first I had intended this post to only cover squad composition, but eventually decided to include some consideration of the class(es) used as officers, as well as bond mate pairings. These are not the most critical choices in a campaign, but they are worthy of some discussion.
Officer Class
The 3 most popular classes for officers are Grenadier, Shinobi, and Sharpshooter. You can probably add Specialist as well if you are partial to that class.
I prefer the Shinobi officer to all other classes; I like having a Shinobi on every mission (for the scouting), and officer abilities give them something to do from concealment. As an added benefit, they can be used on stealth missions as well as combat missions.
Grenadiers are highly regarded as officers because certain abilities (Rapid Deployment, Salvo) will allow them to throw a grenade without ending their turn, which then enables them to Command another soldier. Grenadiers are also nice to have along on every mission.
Holobot officers are free to use Command while still doing something useful - holo targeting enemies. At Major rank they can also grant a significant aim boost to their squad.
If you use a single class as officers, which is what I do with my Shinobis, this will increase soldier interchangeability. Should one of my officers get injured, or need to train, or need to improve their pair bond, I can just use a different officer Shinobi, and it won’t matter very much. Officers require a lot of training, and so this interchangeability is often relevant.
Officer Abilities
Below are my preferences for officer abilities.
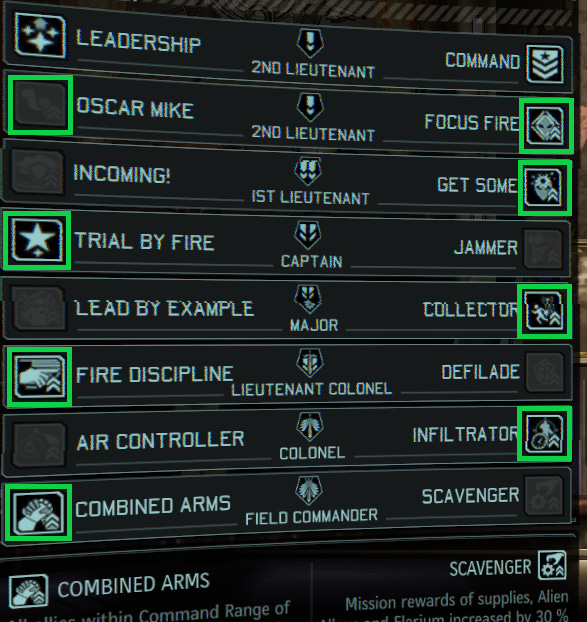
I’m not quite sure whether I prefer Focus Fire or Oscar Mike, but at every other rank, I feel the choice is pretty obvious.
Jammer might be worth grabbing if you’ve already leveled your entire barracks up to SGT rank, but otherwise it’s not nearly as good as Trial By Fire.
Lead By Example makes sense with high aim, otherwise Collector is the better ability.
Squad Roles
Good squad composition means that you can handle a variety of situations well, and that usually means that you have at least one soldier in the squad who can perform important tasks. And this leads us to the concept of roles within the squad. You have guys who can scout, and guys who can do a lot of damage, and guys who can hack the terminal from range, and so forth. Sometimes you don’t have many options, and so you just send the soldiers that are available - but if you have the ability to send a balanced squad, that will help.
These are all the roles to consider (very loosely ordered by priority):
Killer - attacks with high damage + high probability
Control - burn, stun, freeze, hack, Combatives, psi, Disabling Shot, suppression, etc.
Officer
Scout
Shooter - high damage attacks at range.
Hacker - to hack objective from range and hack for loot.
Boss Killer - shred, multiple shots, bluescreen, rupture
Cover Destruction
Squadsight - For Sniper cheese on HQ
Overwatch
Healer
Tank
This priority ranking is a very rough approximation, because role priority changes dramatically from mission to mission and over the course of the campaign. For example, on a Haven Defense the scout role is negligible, and the overwatch role is far more valuable, and so forth.
Some roles (Killer, Control) are generally far more important than other roles (Overwatch, Tank). It is ideal to have multiple soldiers that fulfill the most important roles, and do it in different ways, rather than filling the less important roles.
Bondmates
In deciding which soldiers to pair up, the primary concern is going to be the use of the Advanced Teamwork ability, as well as filling multiple squad roles.
Some classes will find it much easier to donate an action to their bondmate; you want to pair up these soldiers with those that are greedy for extra actions.
Givers:1
Shinobi
Specialist
Grenadier
Sharpshooter (Holobot)
Gunner
It’s important to note that Givers are determined by their ability to donate an action without decreasing their own combat effectiveness, not by an inability to use an extra action. The Grenadier, for example, can give his first action away, and then still fire off a grenade, which is why he is a Giver; but the Grenadier is also capable of using an extra action as well. Givers can also be Takers. There is no reason you can’t pair up two Givers, so long as both of them are also Takers.
Of the Givers, the Shinobi, Grenadier, and Gunner are also Takers, while the Holobot and Specialist are not. Of the remaining classes, almost all of them are Taker. The exceptions are listed below with a brief explanation.
Bad bondmates (neither Givers nor Takers):
Sharpshooter (DFA) - Needs 2 actions to shoot.
Technical - Needs 2 actions to fire an accurate rocket. Flamethrower has limited uses and a short range, and so it is hard/inefficient to use twice.
Psi Operative - Long cooldown timers on their best abilities are problematic for the PsiOp; giving them extra actions is often inefficient.
It is best to treat these soldier classes as solo agents that are added when needed. This doesn’t mean you shouldn’t bond them. I am happy to bond my Psi Operatives to any other strong soldier; but they rarely derive much benefit from that pairing, and they are extremely useful on missions without their bondmate. I form the bond because I know I want to bring Psi Ops, and any bond is better than no bond.
Aside from Advanced Teamwork, there are other advantages to bonding, and one of them is an aim bonus when bondmates target the same enemy. To take advantage of this bonus you could pair shooters together. This is particularly useful for low aim shooters such as Gunners and Skirmishers, but all shooters will benefit.
The primary way that bonds affect squad composition is that they are a huge complication. They complicate squad management, haven advisor assignments, covert operations, and really the whole game. If you want to maximize the number of bonded soldiers you bring on missions, then you need to puzzle out in advance which pairs of classes work well together and also enable the formation of squads that include every important role, and then bond soldiers based on class rather than compatibility (which will at times mean that you are forcing a bond between soldiers with low compatibility) and then give some consideration to important XCOM row abilities (such as Holo Targeting and Disabling Shot which are desirable in every squad), as well as the interchangeability of other soldier pairings, because injury and training will sideline them from time to time. In short, optimizing bonds requires a lot of fiddling around, which is both tedious and boring. It will eventually make your squads stronger, but it won’t always be fun.
Good Class Pairings:
Shinobi + Ranger/Gunner/Assault - The Ranger/Gunner/Assault is greedy for extra actions, and the Shinobi is a generous class. Checks a lot of boxes.
Specialist + Ranger/Gunner/Assault - The Ranger/Gunner/Assault is greedy for extra actions, and the Specialist is the most generous class. These pairings offsets the weakness of the Specialist, who is not good in combat, but can usually donate an action. Checks a lot of boxes.
Grenadier + Reaper/Templar - The Reaper/Templar can always use another action, but are also able to spare one if the Grenadier needs to fire off another grenade. Checks a lot of boxes.
Skirmisher + Ranger/Gunner - There will usually be an opportunity to share an action between these classes. More significantly, the Skirmisher and Gunner are low aim shooters that will get a lot of value from the bondmate aim bonus. Checks a lot of boxes.
For each of these pairings, I noted that each one “Checks a lot of boxes”. What I mean by that is that I am pairing up soldiers that fill different roles within the squad. Some class pairings are not ideal because those soldiers perform similar roles and that can create redundancy in the squad, while also making it harder to group up multiple squads, because that role is concentrated in one pairing.
Bad Class Pairings:
Grenadier + Technical - A lot of redundancy; both classes destroy cover and control enemies with burning attacks.
Gunner + Ranger - Way too much redundancy, but the aim bonus will be good.
Shinobi + Specialist - When the Shinobi is scouting this pair has weak offense, and won’t benefit from Advanced Teamwork.
Reaper + Ranger - No Giver. A lot of redundancy.
Reaper + Assault - No Giver.
Reaper + Gunner - A lot of redundancy, but the aim bonus will be good.
Example Squads
So now I’m going to put all this together and group all of the classes into possible squads. I am using Shinobi officers and the builds I have defined in my other posts, and I am going to consider two different stages in the campaign; Early Game, and the Mid to Late game.
Early Game:
Let’s say we started with a Skirmisher, and let’s fill up 2 squads intended for standard missions, with 5 men each, using all the classes currently available.
Squad 1: Shinobi, Ranger, Grenadier, Assault, Specialist.
Squad 2: Shinobi, Gunner, Technical, Skirmisher, Sharpshooter.
Both of these squads have an officer, a scout, 2 killers (Shinobi, Assault, Skirmisher), 1 or 2 controls (Assault, Technical, Gunner), 1 or 2 shooters (Ranger, Gunner, Sharpshooter), and Cover Destruction (Grenadier, Technical).
Both of these squads have paltry control, as is always the case in the early game, and will need to supplement that with flashbangs.
There are a few differences between the squads: Squad 1 is intended for missions with hacking objectives as it has the Specialist. It also has some overwatch with the Ever Vigilant Ranger. Squad 2 will be stronger in combat because it has both the Technical and the Skirmisher.
While bonding is not yet a big deal, we can already imagine a few useful bonds forming between the Shinobi +Ranger/Assault, Specialist + Ranger/Assault, Shinobi/Gunner or Gunner/Skirmisher.
Mid to Late Game:
In the midgame let’s suppose that we are gifted a Reaper, buy a Spark, and have trained a couple Psi Ops. Let’s also assume that we’ve acquired an Incendiary Grenade or Frost Grenade. Let’s increase the squad size to 6 - while we still need to use 5 soldiers from time to time, taking 6+ soldiers will be more common. For a 5-man GOP mission, I would drop the most experienced non-essential soldier. Bonded soldiers are designated with a ‘+’ symbol.
Squad 1: Shinobi + Ranger, Assault + Specialist, Grenadier + Reaper.
Squad 2: Shinobi + Gunner, Skirmisher + Psi Operative, Sharpshooter, Spark.
Covert Operation: Technical + Assault/Ranger/Gunner.
Again I am using every soldier class currently available, and balancing the squads so that each has every role filled.
Both squads have an officer, and a scout, 2 killers (Shinobi, Assault, Skirmisher), 2 strong controls (Assault, Grenadier, PsiOp, Skirmisher), 2+ shooters (Ranger, Reaper, Gunner, Sharpshooter, Spark). Both squads now have a Hacker (Specialist, Spark), and both can now field a Boss Killer (Ranger, Gunner).
There as some small differences: Squad 1 has a potential Healer (Specialist) and cover destruction (Grenadier). Squad 2 lacks both of those roles but has a decent tank (Spark).
There are now more bondmates, and it is worth noting that there is a good deal of interchangeability between the squads. Both squads have a Shinobi/Shooter pairing that can be swapped between them. The Grenadier/Reaper and Skirmisher/PsiOp pairings also overlap in 2 roles (shooter and control) so those pairs can also be switched between the 2 squads without unbalancing them.
Some Other Concerns
Sometimes a single soldier can carry the whole squad. In the early game the Spark can do exactly that. When you take a soldier that can carry the squad, it makes sense to bring soldiers that you need to level up rather than optimizing for squad strength.
A few classes become absolute monsters at higher ranks: Reapers, Assaults, Grenadiers, and Psi Operators. Soldiers in these classes should be power leveled by reserving a spot for them on most missions.
The main reason that I use uniform builds for my classes is not because I think those builds are the best (though that is part of it), but rather because they are an easy way to simplify the game. There are a bewildering number of options for squad composition; 13 classes and all of them with multiple builds. You really must make some tough choices about which classes/builds you actually want to level up, and how to combine those soldiers into teams, and who to pair them with. And you have to make these decisions pretty early in the campaign.
These are also very loose categories, that can vary by soldier build and the stage of the campaign. For example: A Gunner can give away his first action without losing combat potential for most of the campaign, but after acquiring Traverse Fire at MSGT rank, this is no longer the case. The same is true for the Reaper, but at GSGT rank with Light’Em Up.