
XCOM: EU/EW - Beating March
Getting through March will require some luck, one sergeant, and a bunch of explosives.

This post is meant to help players win at the highest difficulty setting; Ironman/Impossible; though I am sure it will help you play at any level. March is by far the hardest month in XCOM: EU/EW when playing I/I, and its not even close. The most hardened veterans of XCOM don’t expect to make it through March on their first attempt. But failure isn’t much of a set back. You can make a half dozen attempts at March in a single sitting; whereas a bad mission in April of Long War, can wipe out 4 hours of success.
You will have up to 5 missions in March; The first mission, small UFO, two abductions, and a Council mission. The UFO mission will be the easiest; Leaving 4 very tough missions. Win those missions, and you win March. With some luck, and liberal use of explosives, you should be able to get through the month… about 10% of the time.
Strategy Layer:
Starting continent: Asia.
Research: Meld Recombination, Weapon Fragments, Experimental Weapons, Alien Materials, Carapace Armor.
Build: Satellite (day 1), Scope (after weapon fragments), Cybernetics Lab, 2 Phoenix Cannons, OTS (after acquiring a Sgt.)
Other notes: Excavate the entire first floor. Don’t forget to launch your satellite at the end of the month, and move one bird (with Phoenix Cannon) to that continent to protect it.
First Mission:
Enemy Pods: 3/3/2. All sectoids.
Your squad: 4 rookies.
It is very hard to win this mission if you don’t engineer at least one door breach ambush or overwatch trap, or similar advantage. You need to get one of the meld cannisters in order to start research on meld recombination. Its not essential but it will make things easier at the end of the month and in April. Here are some tips that are useful on the first mission, and throughout the campaign:
Memorize the maps, and where enemy pods may be located. Sometimes this will help you set up the perfect ambush.
After you have a meld cannister take all the time you need. Overwatch creep when no pods are active. Maybe you will start off an encounter with some free shots.
Camp in good cover. Or near to good cover. Its not the cover you have, but the cover you get once they start shooting at you.
Grenades. Grenades are necessary for victory in March. Don’t be afraid to use 2 grenades on a group of 2 or 3 sectoids. Ideally you want to conserve your grenades, but sometimes it makes sense to play it safe.
Line of Sight obstructions are your best friend. Use buildings to get in close and set up a door breach ambush or other alpha strike. Or hide behind walls during the alien’s turn, then peek around the corner hoping for an easy flank. Or destroy walls to create flanks. Use the environment to your advantage.
Don’t forget that you can move backwards as well. If you are in a bad position consider moving your squad back into high cover and overwatching. Often the aliens will charge forward and give you some free shots.
Sectoids love mind merge, and you should love it too. The mind merge animation can be seen through fog of war, thus giving you important intel on the enemy’s location. Even better, if you can find a way to kill the caster, you can get 2 kills for the price of one.
Hunkering in high cover is a good way to lure the aliens in closer, thus enabling you to throw grenades at them on your following turn.
Roofs are extremely useful. Not only do you get a 20% aim bonus when shooting from elevation, but you can also control the engagement by using the roof to block LOS.
You can use a roof to safely advance towards the enemy, and drop down right next to your target. This tactic is risky when there are more pods on the map, as it can easily activate them and leave your soldier vulnerable; but when there is only one pod left, dropping down from a roof is a powerful way to close out the mission. Just be careful when moving after you drop down as the Sectoids love to overwatch when out of visible range.
Activating multiple pods is terrible. Controlling where the battle takes place can help you avoid fighting additional enemies. You want to maneuver around the edges of the map, so that you decrease the chance of fighting 2 pods at the same time.
Keep track of which soldiers have kills. Without a kill, your rookies will not promote to the next rank.
Use high cover (40) and avoid low cover (20) as much as possible. It is worth taking low cover only when you dramatically improve your chance to kill an alien; getting a flanking shot, throwing a grenade, etc.
Proximity bonuses are deadly, and the aliens get them too. Its +4.5 aim per tile starting at about 9 tiles away. For more information, check out the Chance to Hit page at the Ufopaedia. Even if you are in high cover, a sectoid that is 2 tiles away is probably going to hit you. (65 aim +10 Impossible - 40 high cover + 33 proximity = 68). When the enemy gets in close, defense becomes even less effective, and you should focus primarily on offense.
The UFO:
Enemy Pods: 2/2/1. 4 sectoids and an Outsider.
Your Squad: Bring 2 rookies and 2 ranked soldiers. Priority: Heavy > Assault > Support > Sniper.
Hopefully the UFO will be your 2nd mission, which will help you level up a couple more rookies. This mission is the easiest in March and so I would recommend taking only 2 ranked soldiers and 2 rookies, to build up your barracks. Go ahead and try for the meld cannisters as well, as this is the best opportunity to do so. The sectoid pods should be eliminated before you get near the UFO. Usually it is easy to find and kill both pods, especially if you bring a Heavy. But don’t underestimate the Sectoids. A lucky crit will still kill any of your soldiers.
Regarding the Outsider, it is all about how you approach the UFO. Don’t approach it at all, until you have killed the Sectoids. Then you can use sound cues to locate the Outsider. This is done by observing 2 sound cues from 2 different locations; the intersection of those lines will be the Outsider’s location. You can approach the UFO safely by using a wall that obstructs the view of that location. If you can move your whole squad up to UFO, proximity will make the rest easy. 2 soldiers with grenades can now dispatch the Outsider, or some combination of a grenade and shooters. The only time the Outsider is a problem is when it is accidentally activated while engaging other enemies. Don’t do that.
Try to get a kill for each of your rookies so that they can promote; if you are lucky, you will get your second Heavy early.
Abductions:
Mission Reward: Your choice of reward is important. I suggest taking the Scientists as your reward for the first abduction; the Sgt. Soldier for the second abduction if you haven’t yet received a Sgt. as a reward. If you already have a Sgt. you should get the Engineers. The plan is to get the Scientists to speed up research so that you can acquire Carapace armor sooner. Then to grab the Sgt. Soldier to build the OTS, and then buy Squad Size I. The next reward should be the Engineers to build another Satellite Uplink, the deadline to start building is April 15. If you don’t get Engineers in March, you can grab them on the first April Abduction. Getting each of these 3 rewards is necessary, and getting them in this order is ideal.
Enemy Pods: 3/3/2/2 (Difficult) or 3/3/3/3 (Very Difficult) All Sectoids.
Your Squad: Bring your best soldiers. Heavy > Everybody else.
The only difference between abductions and the starting mission is that there will be 4 pods of sectoids instead of 3. Hopefully you will have better soldiers to balance the odds. If you can bring a Heavy you can eliminate an entire pod with a well placed rocket. If you can bring 2 Heavies on an abduction mission, your squad will have a clear advantage.
Tips for the Heavy:
Equip the Heavy with a grenade. Other soldiers will make better use of scopes and vests.
The rocket is your most valuable asset, but don’t horde it. If it can kill two or more sectoids that you cannot reach with grenades, it is worth firing.
The rocket cannot reach much beyond visible range, so you need to position your heavy close to the front in order to use it on an activating pod because the enemy will typically move backwards.
Once you move a Heavy, he cannot fire the rocket. Use the Support, Assault, or a Rookie to scout forward and verify that no enemies will be activated, before moving the Heavy.
A Heavy with Bullet Storm can shoot twice or shoot then Hunker. This is a good strategy if the Sectoids don’t have any other shots.
The Heavy is your most valuable class in the early game, and you should not put this soldier at risk unless it is absolutely necessary.
Tips for the Assault:
Equip the Assault with a grenade until you get to April and have Squad Size I. Against Sectoids, an Assault will probably survive one shot regardless of the Nano-Fiber Vest. Against Floaters and Thin Men, the Nano-Fiber vest makes more sense.
Don’t over use Run & Gun early in the mission, as there is too much chance of activating another pod. Instead the Assault can throw a grenade, or hunker tank, or set up for a flanking shot.
It is usually better to be on overwatch with the Pistol, instead of the shotgun, unless a pod is likely to come around a nearby corner. Just remember to switch back to the shotgun when you go in for the kill.
Tips for the Support:
The Support class should equip a grenade throughout the early game. They lack offense and grenades are very useful.
Don’t forget about your Smoke Grenade. It is usually better to use it at the first opportunity, as any casualties will make the remainder of the mission much harder.
Tips for the Sniper:
Equip the Sniper with a scope as soon as possible. This is your best shooter and will be doing most of the shooting.
Getting elevation will make the Sniper very dangerous, but usually that means taking low cover. With only 4 health this should be done carefully.
The Sniper needs both actions to fight effectively, and so it is necessary to make sure that you won’t be fighting before you move the Sniper. Scout ahead with the Support or Rookie or Assault.
Use the Headshot ability when the target has more than 3 health. If the target has 3 health or less, any hit is already a guaranteed kill.
Getting a MEC in March:
If you grabbed a meld cannister on the first mission, and immediately started meld recombination research (8 days), then built the Cybernetics Lab (10 days), then prepped a soldier (3 days) you will have a MEC soldier ready to fight on the 22nd of March. Usually this means you can take a MEC on the 2nd Abduction mission, which is great.
The soldier class of your first MEC is not very important, as his aim will be permanently hobbled by having been MEC’ed early. I suggest picking the least valuable squaddie. This soldier will be valuable only as a heavy hitter with Collateral Damage, that can also absorb some enemy fire. The purpose of your first MEC is to help you get through the early game. Later in the campaign you can convert a Colonel Sniper (105 aim) and that MEC will become your primary.
Tips for the MEC:
MECs are not tanks, starting with only 12 HP. Against Sectoids your MEC can survive 2 hits, maybe 3 and that’s it.
Collateral Damage is an incredible ability. It can destroy cover and explode vehicles which guarantees kills. But it requires a full clip of ammunition. If you put your MEC on overwatch, he will not be able to use Collateral Damage on the following turn, unless he is Cpt. rank and has Expanded Storage. This creates a dilemma: Does the MEC overwatch or save ammo for Collateral Damage? If the enemy is likely to take cover behind a vehicle, it is preferable to save your ammo. Otherwise the overwatch is probably better.
The Flamethrower can guarantee kills on all early game enemies, but requires the MEC to get pretty close. Like an Assault, the MEC should stay back for fear of activating more pods of enemies.
Council Mission:
The Council Mission in March will have an equal chance of being one of these 3 mission types:
Target Extraction (Van Doorn)
Target Escort (either Thorne, Carlock, or Marazuki)
Bomb Disposal
There is also a slight chance (I believe ~6%) that there will be no Council Mission in March and instead an extra Council Request will be offered.
Bomb Disposals are brutal in March. There will be 7 sectoids, and one Thin Man on the map, then 4 more Thin Men will drop-in after disarming the bomb. It is very hard to push forward fast enough to win, without jeopardizing your troops. And even if you manage to disarm the bomb, you will likely take casualties from the 4 drop-ins. I would suggest skipping the Bomb Disposal as this mission is very likely to end your campaign. Skipping it will result in +2 Panic (at Impossible Difficulty) across the continent. If this tips multiple countries into the red, you may want to attempt the bomb disposal despite terrible odds. Keep in mind that the next abduction can add another pip of Panic to all the countries on that continent.
The other Council Missions are much easier because there is no timer forcing you to move recklessly forward. Also each Target Escort/Extraction mission always occurs on the same map, and is scripted; once you learn where all the enemies are, you can consistently beat it. Taking notes has served me very well. Below are my notes for the Van Doorn mission.
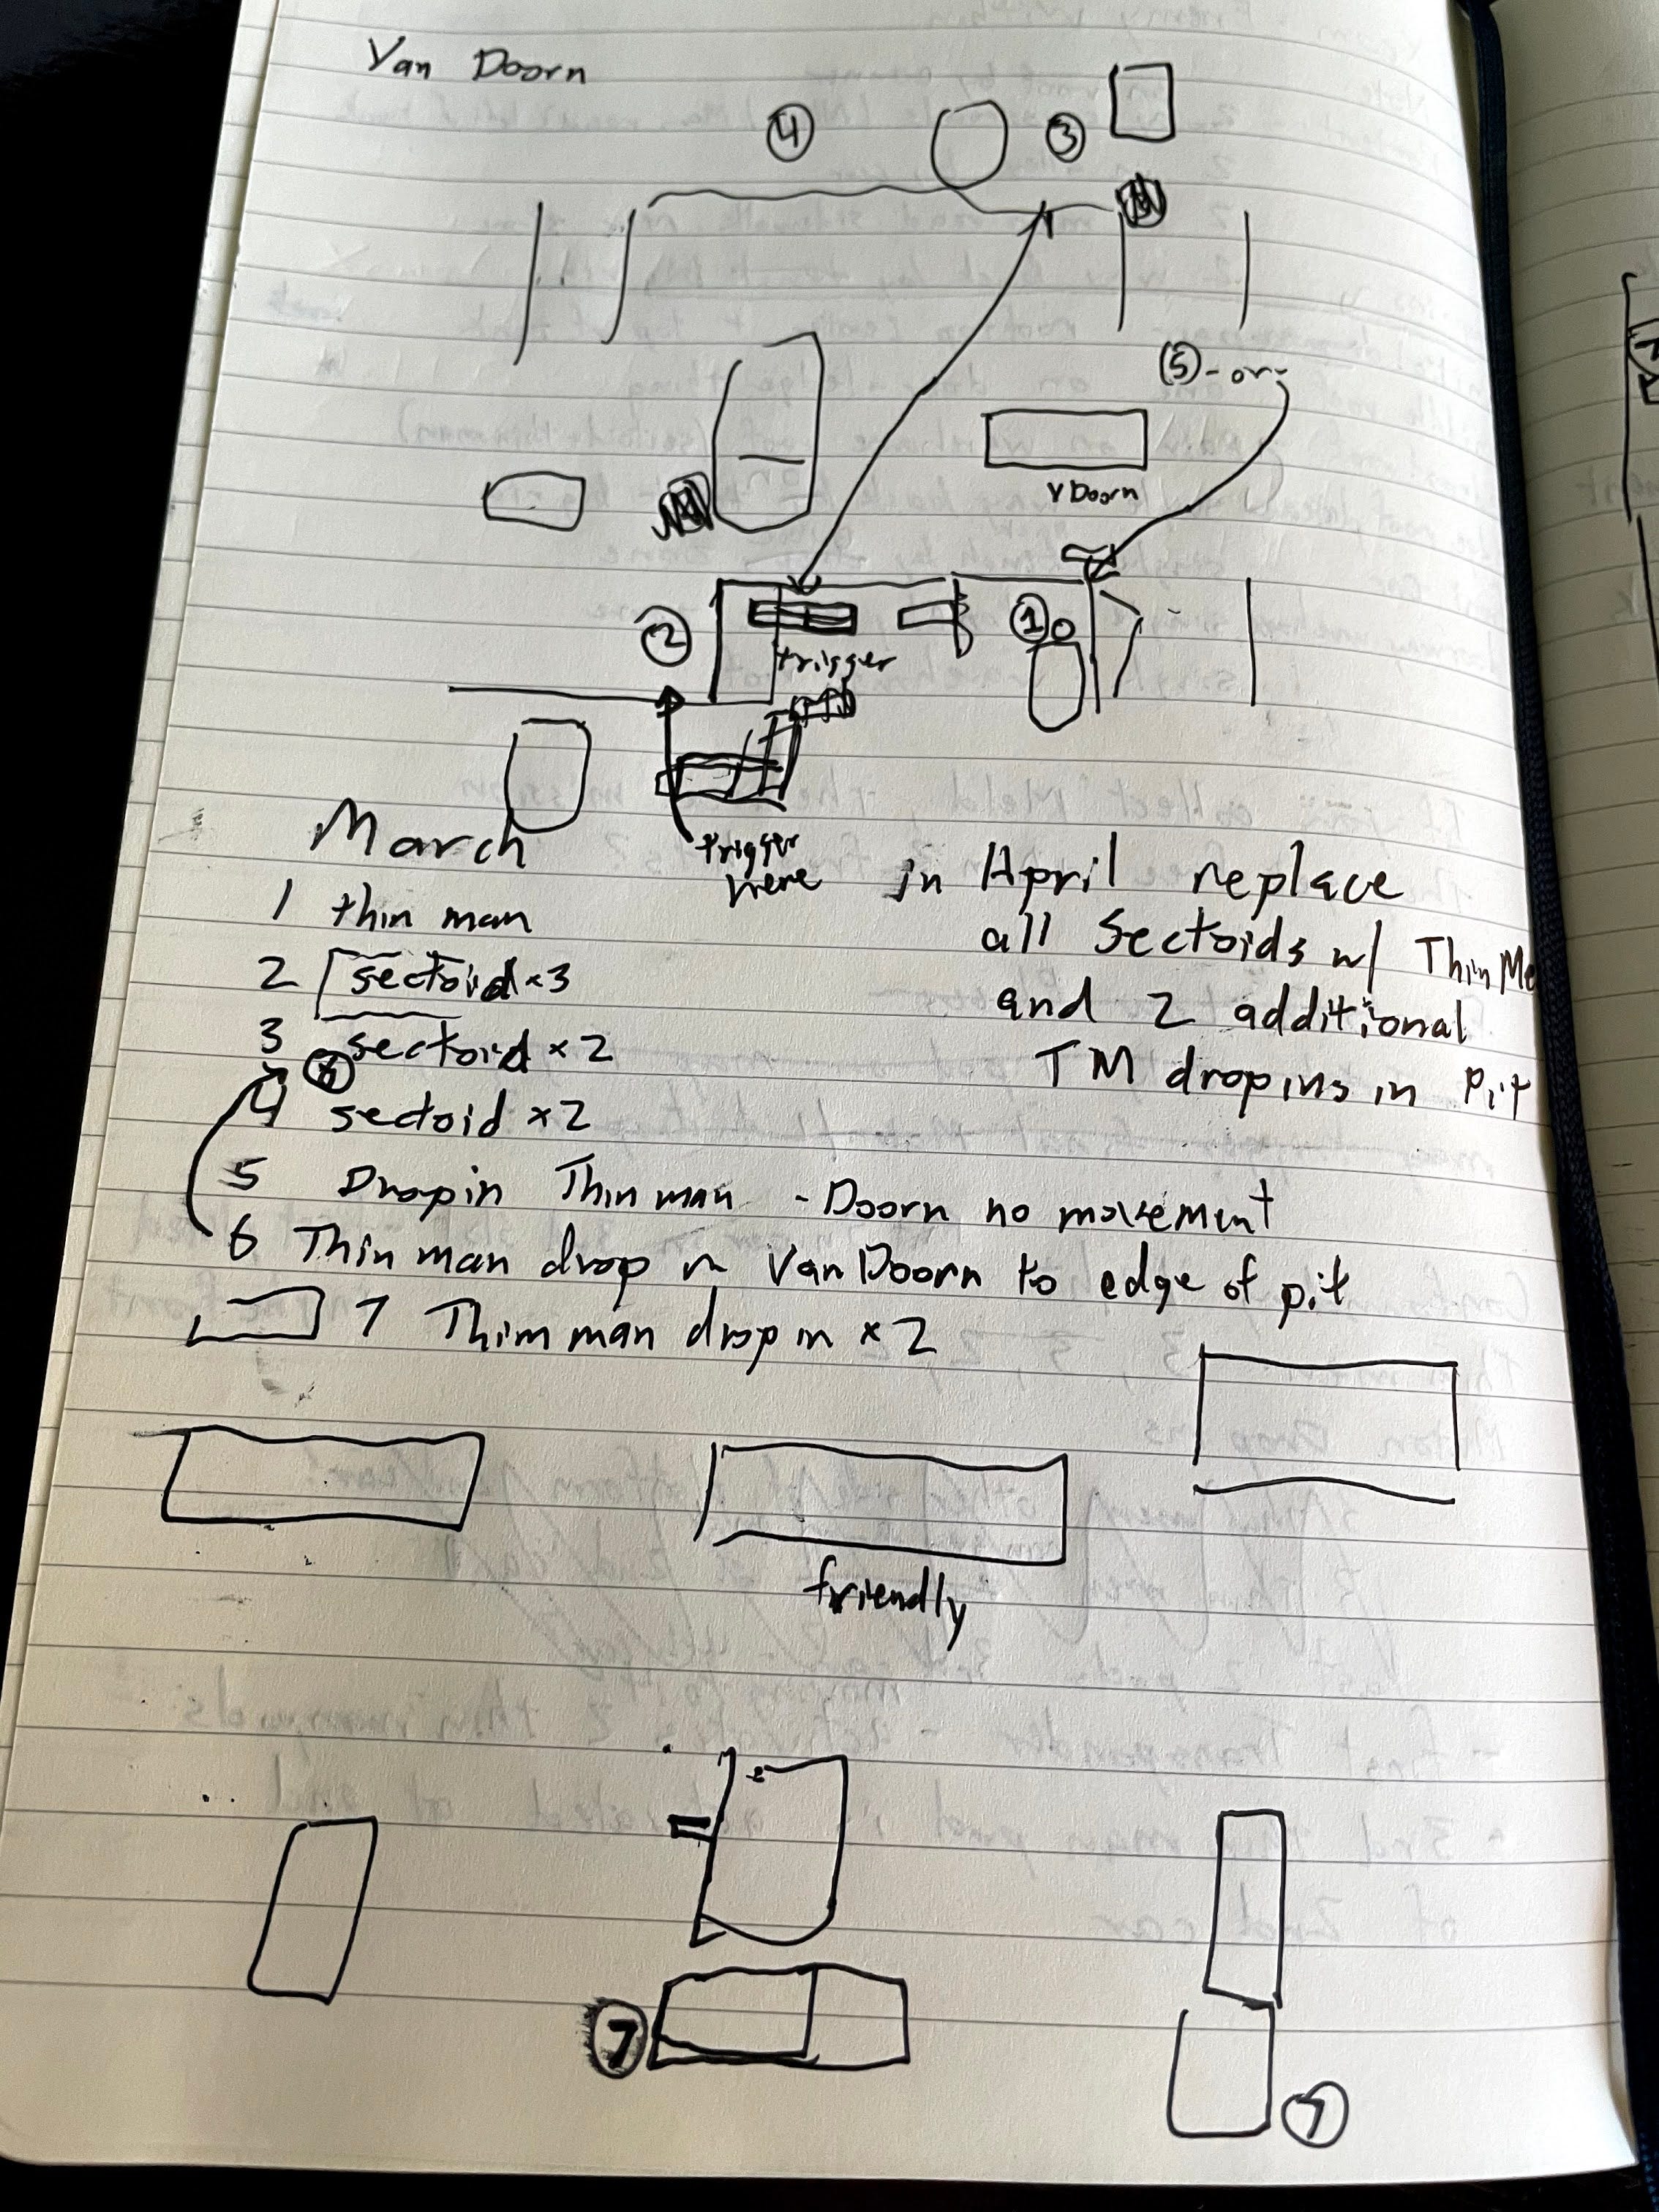
Its ugly, to be sure, but its also one of the more useful documents that I have made for this game.
If you are lucky enough to get either the Van Doorn extraction or the Thorne escort mission you will be rewarded a Sgt. soldier, which enables you to begin construction of the OTS, and eventually to buy Squad Size I. If you do not get a soldier reward from the Council mission, you should select the soldier reward from the 2nd abduction mission. Either way, you want to have the OTS started before you get to April as you will need that extra soldier to have a good chance at surviving.
What do you think about a more economic strategy layer opener I have seen others use that sends up 4 sats in march? It has some weaknesses, like needing some RNG to be able get the money in time, and it makes april a bit harder, but after that you are way ahead. I would love to hear your thoughts on it.