


Long War - More Early Game Tactics
More intel from the frontlines.

I’ve started playing Long War again and wanted to write a bit more about it. This time through I am jacking up the difficulty with the ‘On Our Own’ starting bonus, and no Shadow Device. Also adding to the difficulty - I’m out of practice. It’s been almost 4 years since I last played Long War, and I’ve forgotten quite a bit. I reviewed all my Long War early game posts (March Tactics, April to June Tactics, Early Game Strategy) which was helpful, but they lacked many of the small details that might have helped me get back up to speed faster.
And so this post is intended to rectify that. I want to get some more thoughts written down. 4 years from now, future me should find all this useful when he starts up a new campaign.
March Squad Composition
I was a little over confident at first, bringing too many rookies on early missions, thinking ‘hey, I was able to win the first mission with all rookies - why not bring 4 on the next one?’ This is risky, and my first campaign unraveled after a few mistakes followed by a panic chain. You can still lose with veterans, but they give you more leeway.
For mission #2 it is perfectly fine to exhaust vets if they are still fatigued. In this situation I think it best to use a 50/50 rookie to veteran split, with at least one Rocketeer/Engineer. And we really need to get those rookies some kills so that they become squaddies who can then replace the vets that were exhausted. When the barracks is a bit stronger I go with 2 rookies on easy missions, 1 on hard missions.
For each of the supra-classes, I’ve chosen one class to prioritize; rocketeer, engineer, scout, and assault. They are better in the early game than their counterparts. Rocketeers are just the best early game soldier. Engineers are really good as well - they get more grenades, can throw them further, and have a higher chance of breaking cover. Scouts are crucial for dealing with overwatchers (especially since I won’t have gunners yet), and Assaults are the best at finishing outsiders or the last enemy in a pod. One of each of these classes, plus 2 rookies is a solid squad.
I play with strict screening, which makes it easier to control soldier class assignments. But without it, I could do much the same by first training the rookies with average-ish stats. This will avoid having to choose between a high aim engineer, or a random class.
Not enough money for SHIVs? That’s okay, you don’t need them. I had far less money in March than I am used to, and I wanted to spend it on satellite expansion. And so I never built any SHIVs, and things were fine in March, and April as well. This was kind of surprising - I have relied heavily on SHIVs in previous campaigns. For hard missions in the early months I instead turned to double Rocketeer squads, which are even better.
Double Rocketeer is the strongest squad in the early months. Its not feasible to run this squad all the time (you will run out of them), but its certainly possible for most of the hard missions.
Load-outs should be heavy on explosives, of course. And you may want to instruct your men to refrain from using explosives to toss explosives impetuously. Just be sure to keep track of the sectoid corpses you destroy on the first mission - you need 5 to start research.
Bring smoke too, and don’t forget to use it.
Alien trophies are not a bad idea for low will soldiers.
Activating Outsiders
It is always nice to be able control the manner in which enemy pods activate, and with outsiders, this is usually the case. The best way to kill an outsider is to get your Assault and Engineer up close before it activates. Run & Gun + AP grenade usually equals victory. Setting up this combination can be done by approaching the UFO with a LOS obstruction between your soldiers and the outsider. To find the position of the outsider you can either use sound cues to triangulate it, or more easily, carry a motion tracker.
If there is an unopened alien door, you can put a shooter on either side of it, and have them steady before the battle starts.
Another trick is to have one soldier hang back, and activate the outsider from as far away as possible, and from the direction you would like the outsider to move in. Activating in this manner usually causes them to move forward towards the activating soldier.
What is the AI going to do?
Sectoids scamper backwards. So do thin men. This is really important to prepare for. It means that if sectoids activate at the edge of your visible range, they will often be out of sight at the start of your turn, and most of your squad will need to move forward in order to attack them. Setting up an overwatch trap in good defensive terrain doesn’t always help - your squad may end up abandoning that position in order to shoot first.
Drones charge forward. This makes them pretty easy to defeat with a steadied rocketeer, and steadied shooters. If you hear drone noise cues it may not be a bad idea to force a quick activation knowing that the drones will come to you. Noise cues aren’t guarantees, so I typically only do this when there is only a pod or two left, and the noise cue is more likely to be accurate.
Drones are perhaps the derpiest enemy in the game. For this reason they are mostly harmless until they get close.
The AI will move forward to kill weakened soldiers - if the enemy can see one of your soldiers, it knows where all of them are. If there are no injured half-cover targets, the AI usually prioritizes the closest target. A hunkered soldier in a forward position is a decent way to distract them.
If the AI has no chance to kill anyone, they are more likely to do something other than shoot, and that something is usually less dangerous. For this reason it is a good idea to equip soldiers so they have at least 6 HP.
The AI will often retreat if you kill half their pod. This is especially true if you don’t give them any good shots and there is no one on overwatch.
Basic Tactics
The safest way to move through the fog of war is by ‘overwatch creeping’, which means having your squad move forward with one action, and overwatch with the other (excepting the rocketeer who should be steadied). This is the safest way to move but it is slow, and will not enable the collection of meld. It is also boring and kind of amateurish.
Let’s speed things up. In my March Tactics guide I already detailed how you can use the Motion Tracker to race through the map. Additionally, you can take advantage of 2 types of terrain: Height, and LOS obstructions. A height advantage gives your soldiers +20 aim1, while approaching the enemy from behind a line of sight obstruction allows your squad to double move into a closer position before activation. Rooftops are notable for providing both Height and obstructing LOS.
But most of the time you will be fighting at equal height with a pod that activates at range. In this circumstance, and because of the backwards scamper, you want the steadied soldiers near the front. Also you want some cover granting terrain 4-6 tiles ahead of your squad so that you can move soldiers close enough to shoot and hopefully also lob grenades on enemy cover. Moving forward gives your squad the first round of targeted shots, often against flanked enemies because scampering sectoids may be unable to find cover.
But sometimes it doesn’t make sense to move forward. In that case you are probably going to want to smoke up and overwatch. It’s important to know this will be your plan at the start of your turn, so you can move your soldiers into positions where the smoke is going to be. It is best to have a plan for every soldier before you start moving them, but in practice we aren’t going to plan everything out unless we are in a crisis. But with smoke, preparation matters. I often find myself counting out tiles from a valuable forward position - three tiles back and one tile to the left or right, that is where I am going to drop the smoke, okay now which of those spots puts smoke in more cover positions? My answer to that question often determines where I am placing my guys.
When choosing to move forward or fall back, I typically choose forward, terrain permitting. As mentioned earlier, if I kill half the pod, they may retreat and so there won’t be any return fire. Alpha striking is also faster. It makes it easier to collect meld, and reduces the chance of fighting multiple pods at the same time.
Some Other Options
When the enemy is in an entrenched position it is often preferable to set something up rather than taking low probability shots. Some examples of setting up a play could be:
dashing a soldier left or right so that on the next turn he can get a flanking shot.
moving a grenadier forward then hunkering so that on the next turn he can get in range to throw a grenade.
steadying a shooter (typically from squad sight, or in smoke / high cover).
Your squad ends up foregoing a small chance of success this turn, in exchange for a larger chance at success in the next. But sometimes these plays are inadvisable because they risk activating another pod, or because any delay in killing an enemy means a wounded and vulnerable soldier is likely to die.
Rule #1
There are a lot of little tricks that will help you play better, but let’s not forget that the easiest path to victory in XCom is still and always to fight one pod at a time.
Rules Refresher
Your soldiers can move one tile and not pull an Overwatch. When being suppressed, all movement (and many other actions) will trigger the suppression reaction shot. Reload, hunker and overwatch do not trigger suppression.
Damage does not cancel overwatch. But it does cancel suppression fire. Flashbangs will cancel both, but do not affect sectoid psi abilities.
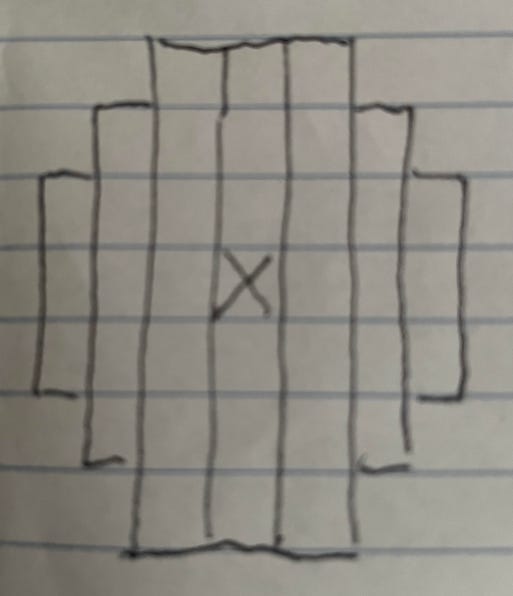
Smoke gives soldiers +20 defense. Does not prevent OW fire, but does prevent the flanking crit bonus. Also it does not diminish the aim of your soldiers. To determine where smoke will land, don’t look at which soldiers are highlighted, that can be wrong. Barring obstructions or large height differences smoke will fill a 7 x 7 grid with the corners trimmed, like so:
Low Cover is +30 defense, 0.66 DR; High Cover +45 defense, 1DR.
Visibility Range is 17 tiles.
(At Impossible difficulty) starting mobility for sectoids, drones and outsiders is 7 tiles; Floaters 8; Thin men 9; Seekers 10; chryssalids 13; zombies 5.
Zombies and chryssalids can move and attack on the turn that they spawn. This is particularly dangerous for spawning chryssalids which have an unreal movement range. fresh zombies will spawn chryssalids after 3 turns. On the third turn, the zombie will start puking, which is your heads up that a chryssalid is about to spawn. And don’t run your assault over to a chryssalid that has just killed a civilian. The freshly risen zombie will slap him.
Close combat specialist will not proc on a zombie that starts the turn within 4 tiles of your assault. To trigger CCS, the enemy must cross that 4 tile radius circle that surrounds the assault.
Overwatch fire often occurs simultaneously.
This post is followed by: Long War - April to June Tactics.
Height doesn’t actually speed up your movement, but the aim advantage gives you an incentive to get there quicker.
Any suggestions on which region to liberate first? I have my home region and a region next to it with the same number of haven staff, but not sure if there's a difference i should think about