


Long War - April to June Tactics
Long War has a better difficulty curve than EU/EW - it actually gets harder for a few months before getting easier. The April to June period is always exciting, and often tragic.

This is a continuation of my posts on tactics - the previous post was Long War - More Early Game Tactics.
You can look forward to fighting Thin Men in April, Mutons in May, and maybe a Cyberdisc in late June. You will lack real armor, and won’t have lasers for most of this period, and your barracks will still be full of rookies unless you find a way to survive these months.
Its not all bad news. If you did well in March you should have some CPLs, and you should be able to get to Squad Size I in early April, which is a huge upgrade for your squads. With 7 soldiers, some missions will feel like a breeze. The problem is that when things do go wrong, and they will, they tend to go very wrong. One pod activating at the wrong time can result in your squad surrounded by Thin Men or Mutons, and good luck preventing casualties in that situation.
The most important skill during this period is to know when things are likely to go bad, and how to throttle back and entrench, so that you can weather the storm. While this is important throughout the game, it is most relevant during the April to June period, because your soldiers lack armor and experience, and are thus more susceptible to flanking enemies, and panic caused by casualties.
Danger Sense
In certain situations, before any enemy has even appeared, I can get a sick feeling in my stomach, followed by a strong compulsion to overwatch everybody. This is my XCOM danger sense kicking in, and warning me of impending doom. Sometimes its just a false alarm, perhaps triggered by enemy sound cues. The whispery echo of Thin Men is really terrifying. But there is more to it than that. It feels like instinct, but there are often very good reasons for my fear. Here are a few examples of things that trigger my danger sense:
I have moved forward pretty aggressively, or am near the center of the map, but have thus far encountered no enemies, and seen nothing on the motion tracker.
I am on a small map.
I have heard sound pings in multiple directions.
There is a large gap between the cover I am currently using and the cover I would like to move to.
Taking cover against potential enemies in one direction, leaves me flanked to potential enemies in another direction. Or more generally, I have no idea in which direction I will be fighting.
I have heard the sound cues for multiple dangerous enemies, and no easy ones.
I am sure there are other triggers, but that is a good sampling. In these situations I am likely to switch from a Green Light on meld retrieval, to a Red Light meaning just find the safest path forward. This entails moving slower, or even camping a bit, or using Motion Trackers more frequently, or sidling up to the map edge, and other defensive tactics. If I am able to eliminate a pod of enemies, I may give my squad the Green Light again, but typically the meld will already be gone. For this reason I tend to move fast in the first couple of turns, then put on the breaks when things don’t feel right.
Steady a Rocket, Win a Battle
Rockets are very important, especially in first few months. Shooting bullets at enemies that are in cover or flying is too unreliable with low level soldiers. In March you can survive extended fire fights; from April onward, they are likely to get someone killed. A steadied rocket, will often do away with all the fuss, softening up multiple enemies and removing their cover. Of course this only works if the rocket is mostly on target, and that is why I love a steadied CPL Rocketeer with Fire in the Hole, as I argued in my March Tactics post.
If you haven’t yet leveled your Rocketeers to CPL rank you can give them a scope, supposing you have one, which will make their rockets almost as accurate. I don’t like this option as there are limited scopes in April and May and my shooters want that gear as well. Also it leaves the Rocketeer with only two rockets, rather than three.
Steadying constantly means that Rocketeers will only have a single action to move, which makes it hard for them to keep up with the squad. I usually give them SMGs so they won’t need to double move quite so often.
SHIVs
SHIVs are fantastic tanks a solid upgrade over low level soldiers, and they will die for you. Dying doesn’t bother them, and rebuilding only costs $20; less than the price of a rookie. If you have 2 SHIVs, they can take turns getting wrecked. I like to keep my SHIVs smoked up, as enemies seem to keep targeting them despite this, and it will often enable them to tank one extra shot for the team.
For a long time I tried to play through the game without SHIVs thinking that they would stunt the growth of my barracks, and there is some truth in that. Every time you bring a SHIV a soldier loses the experience that would have been gained in its place. But if using SHIVs prevents soldiers from dying, you will end up with more total experience than otherwise. Overall I find that SHIVs help my barracks; Its addition, by preventing subtraction.
EDIT: After further consideration, I am no longer a big fan of SHIVs. They are are great, but also expensive. More problematic, they stunt XP growth. My updated take on SHIVs can be found in this post.
SHIVs have other advantages. They are powerful in the early game, do not panic, can replace either Infantry or Assaults in your lineup, and because they do not fatigue can help your barracks endure a tight cluster of missions. SHIVs are great, and they are at their greatest in the April to July period, before MECs are available and your barracks isn’t fully developed.
Squad Loadout
This is not terribly important, but I find it helpful to assign classes to the same position in the loadout screen. This makes my loadout faster, as I will more easily recognize what I am missing, and it also gives me a small advantage in the first turn of movement. I like the Rocketeer right up front and the Sniper in the back. Also I want the motion trackers at slot 1 and 3, so that I can get a better initial scan by using the tracker that exposes more fog of far.
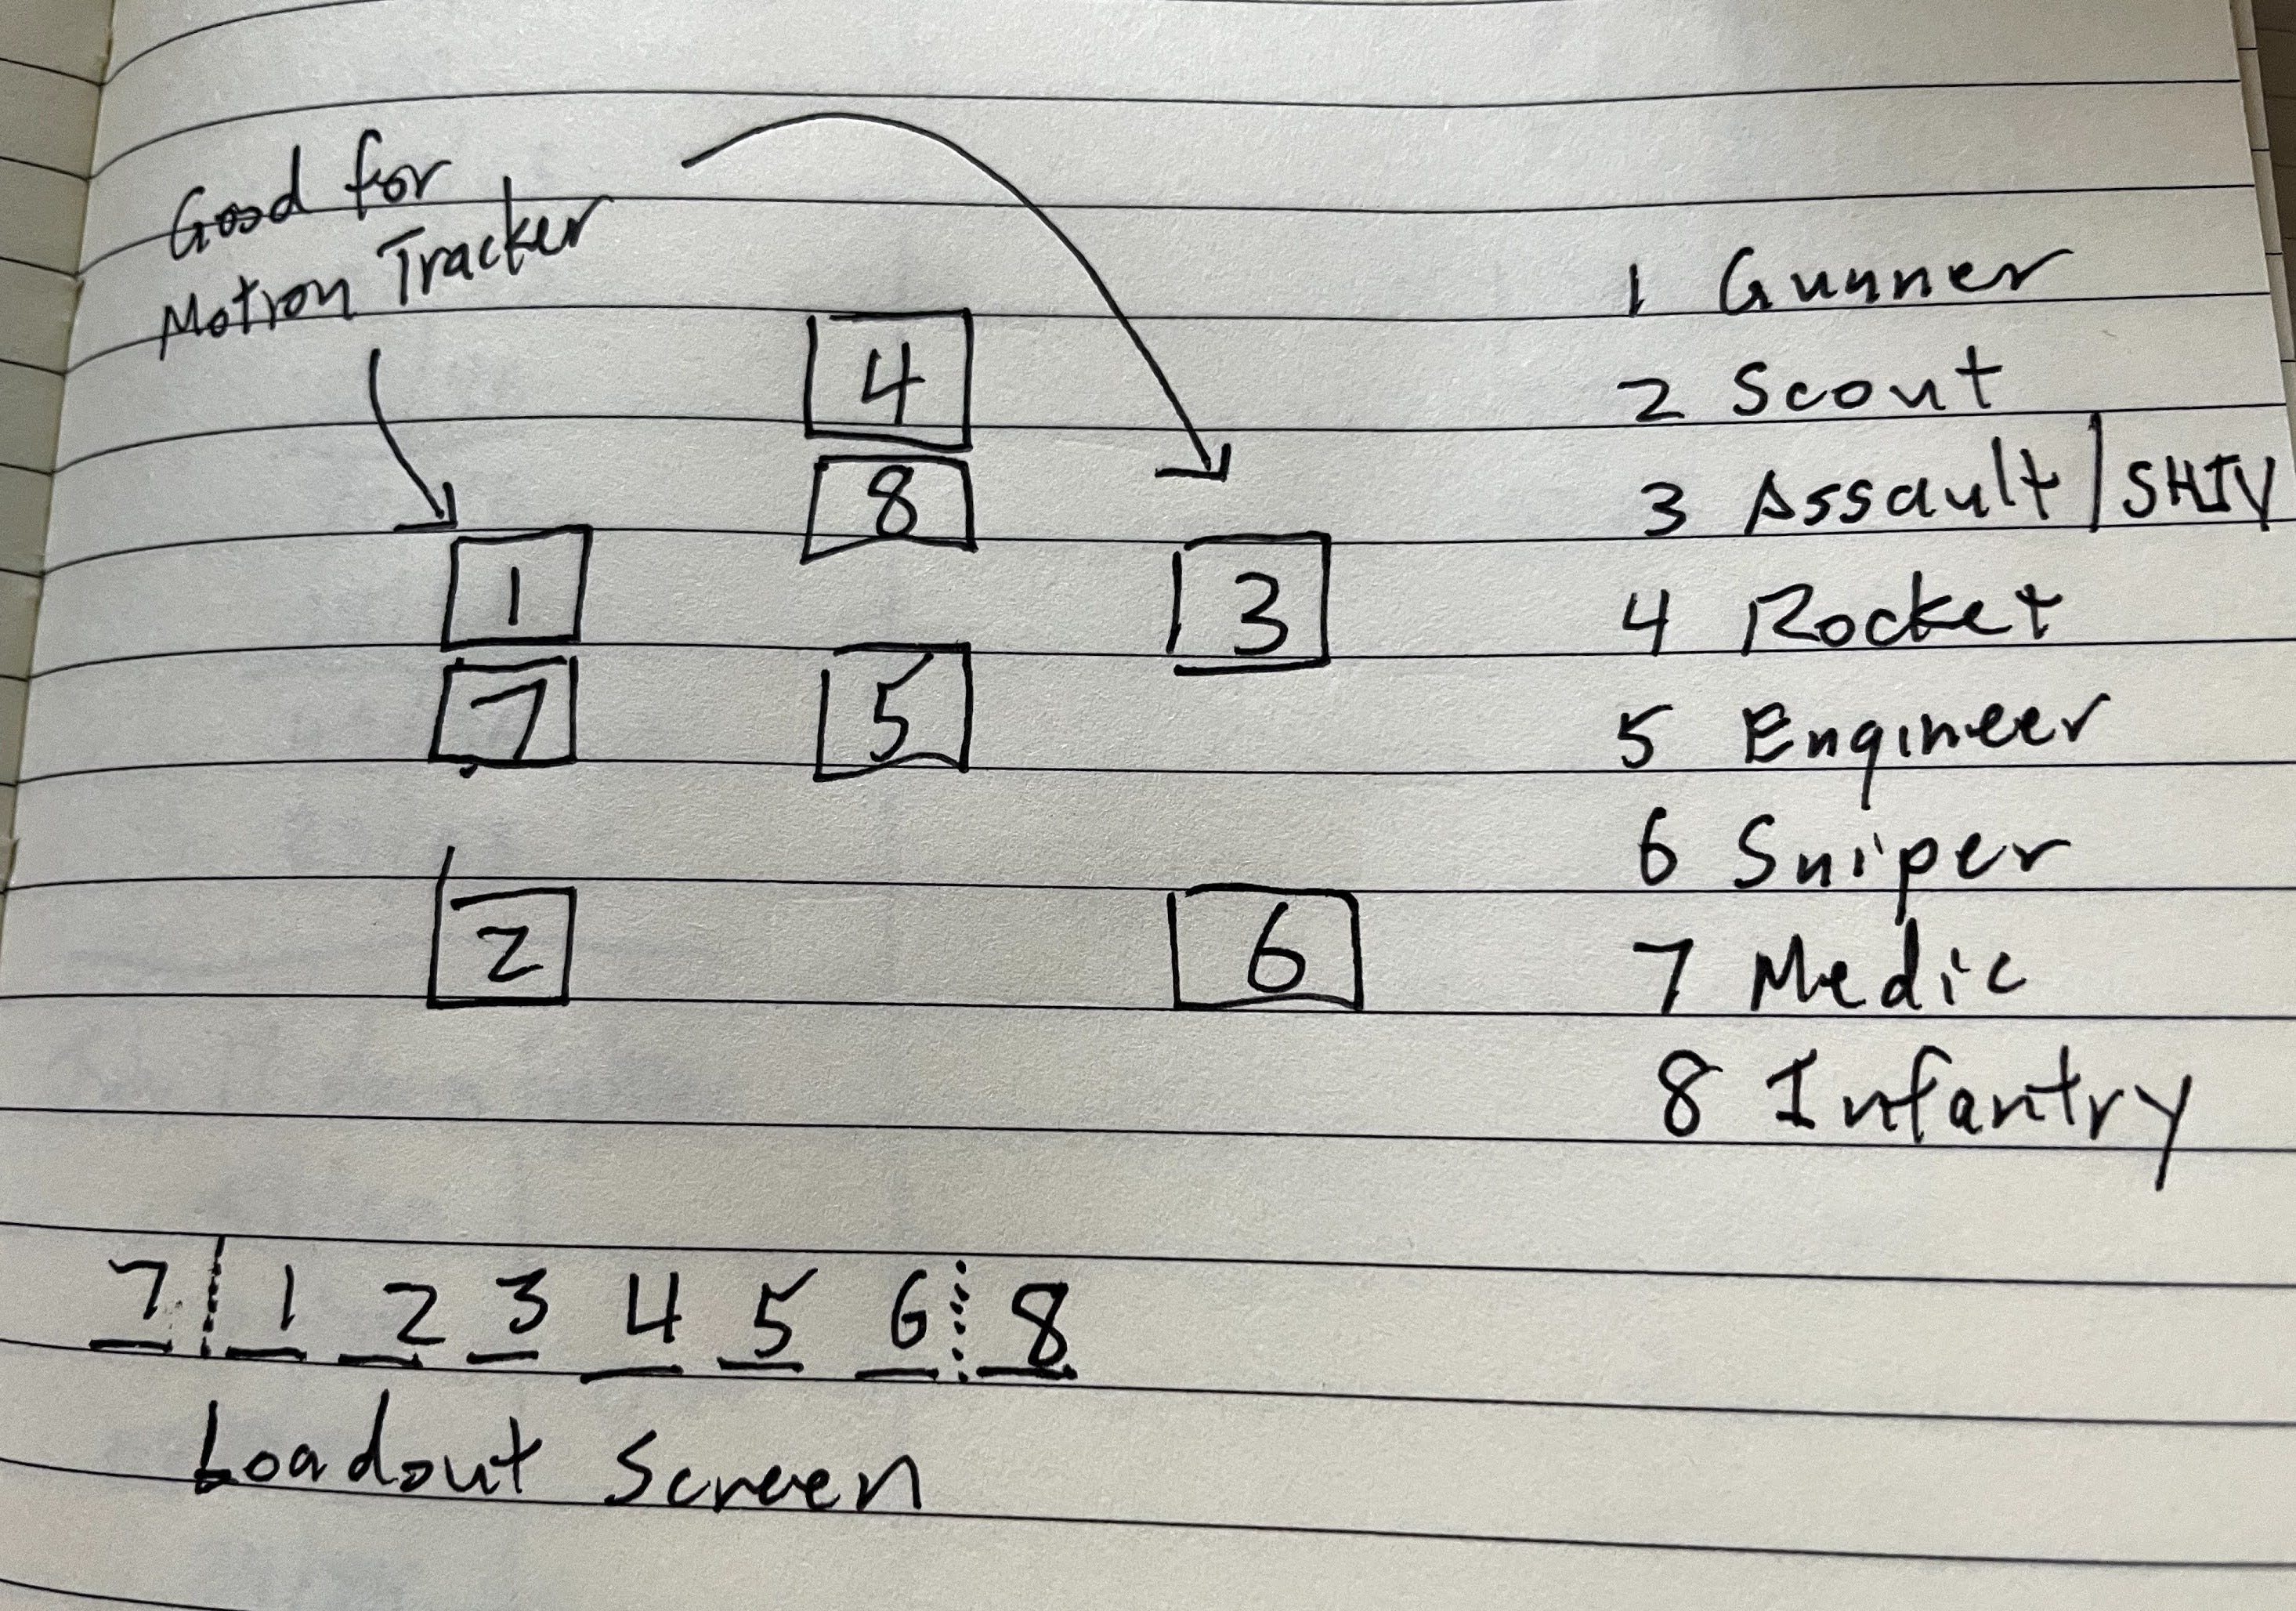
Another tip for squad load out is the the rule of 2s: Bring 2 Smokes, 2 Motion Trackers, 2 soldiers that can blow stuff up. 2 shotguns is a good rule in the early game, and becomes less important each month.
For Exalt Data Recover missions, there is a different rule of 2: Bring 2 Assaults.
Other Tips:
Be mindful not just of the cover that you have, but also the cover that the enemy will have when they arrive.
On activation, the cloaked Seekers will stay close to visible Seekers. A rocket targeting the visible ones will hit all of them, and reveal those that are hidden.
Mutons have bad aim, and so suppression is a good counter. When in high cover the suppressor has almost no chance of being hit by a suppressed Muton.
Cyberdiscs will almost always overwatch when they are suppressed, even when they are flying. This is a very strong option.
The 3rd terror mission will be the Zombie Apocalypse. 2 engineers and 2 assaults works well, sort of like an exalt data recovery mission. Also forego armor and take Hi Cap Mags.
Flashbangs are still great, so don’t forget that they exist. Medics with Smoke and Mirrors can make good use of them. Mutons charge your position, and a flashbang will often control a pair of them.
Once I have Adv. Beam Weapons, I like to build a Laser Strike Rifle for my Snipers. With this equipped they should mostly be steadying rather than overwatching, to compensate for less ammunition. This usually coincides with the appearance of Cyberdiscs, another good reason to steady Snipers with Disabling Shot.
On bomb disposal missions, the enemies will be almost exclusively thin men. With this in mind it makes sense to carry medikits on more soldiers as they will negate the mobility penalty and damage caused by acid.
This post is followed by: Long War - Summer Tactics.
April is an obscene difficulty increase from March - and it's really all due to floaters, and how the game spams floaters.
You go from sectoids/drones and possibly a few thin men to:
* 6 hp floaters - or more if leader/navigator
* elevation aim bonus
* unremovable half cover when your squad is still junior with piss poor aim, abilities, and weapons
* extreme mobility making flanks a serious problem
* you won't have squad size 7 yet for the first several missions
It can be a bit much, especially when RNG decides to throw you some heavy/swarming missions with 12-16 floaters in the first 15 days or so. And this WILL happen.
It starts to smooth out around May when your soldiers get better, and you can get better tactical upgrades