
Long War - More Summer Tactics
A few more details on the tactical layer.

This post is a continuation of my tactics posts. The previous post was Summer Tactics.
This time through, I went with medic officers, and also played around with Scout perks somewhat. On the battlefield I had a few bad activations due to battlescanners, which has caused me to revise my model for how those work. I also saw some very strange behavior from enemy pods which deserve even more consideration. And a few random notes on Itchy Trigger Tentacle, meld levels, and whatever else comes to mind.
Medic Officers Are Great
There are 2 primary considerations when selecting officers. You want a soldier that has high will, because of the will-sharing Lead By Example perk that all Officers start with. You also want a soldier that is happy to give their action to a squad mate. Medics excel at both. They have high will if you get the Steadfast perk at LCPL rank, and if you build them as smokers, as I do, then they can drop smoke with their first action, and then grant their second action to someone else.
My last campaign I ran scout officers, which are also great, but have lower will and for that reason my squad was more susceptible to panic from berserkers and muton intimidation. I have noticed a much lower rate of panic in my current campaign, and it makes a big difference.
Its not all great though. A big disadvantage is that Medics level up slower. Much much slower. It took about an extra month for my top officers to reach Colonel and Field Commander rank. Also, medics make strong psi soldiers, so using them as officers means we have to pick another class to go psi.
For psi duty, I have been using rocketeers, engineers and some random shooters. And that is fine I guess.
Battlescanner bulls***
A thrown battlescanner activated a pod on 4 separate occasions this campaign. None of those bad activations led to any tragedies, but they could have. I’ve written about this before, and thought I had it all figured out. In my Summer Tactics post I wrote:
Battlescanners do a small amount of environmental damage, which is probably negligible, but for whatever reason can blow up vehicles. And if that environmental damage is also what activates enemy pods, then the probability of activation should decline with distance, because environmental damage declines with distance….
[So now] I follow a very simple guideline for the safe use of battlescanners. I will always throw them a tile within visible range, or when using a motion tracker a little beyond visible range, but not much, and of course avoiding any pods detected by the motion tracker. This has worked perfectly.
Well there is more to it. Even if you take these precautions, battlescanners can and will activate enemy pods. And what is worse, it can happen from a significant distance. So now I have a few more rules to follow…
Don’t let battlescanners land within 3 tiles of an alien pod and further away is better.
Don’t be greedy, revealing more fog of war isn’t worth the risk.
If I want to throw a battlescanner, I need to do it early in my turn, so that if it activates a pod, I can mitigate the danger.
Changing my Scout Build
Given that battlescanners can stab me in the back, I am inclined to use them less often. Also, I’d rather not have the battle scanner perk on both my Scout and Engineer builds. My intention on my latest campaign was to only take that perk on my engineers, but it didn’t work out that way. The problem is that Engineers get it at TSGT, and that is too long to wait. You need a Scout with battlescanners (SGT level perk) for that first transport raid, and on those tough terror missions in high panic nations, so we can save more civilians…
The solution, for me, is to use more than one Scout build - taking battlescanners on 2-3 soldiers, and Aggression on the others.
I have also found that Dead Eye is preferable once I reach Adv. Gauss. So I give that perk to the Scouts leveling up later in the campaign. Then, because I want a bunch of Pathfinders, I can switch over to the preferred build in the middle of the campaign by chopping the scouts that have Ranger, and keeping the ones that have Dead Eye.
Because I was fooling around with the scout build, I also tried Aggression instead of VPT. This is a fun perk because it often brings crit probability up to near guaranteed. But considering how many enemies have crit reduction, and also preferring a more reliable bump in damage output, I switched back to VPT.
I used the console command “Grant Perk” to perform this switch - which does work, but it took a long time to figure it out, and it was super annoying. You can grant perks from the soldier loadout screen, but I was only able to remove perks from the tactical combat screen (also called the battlescape), and I needed to use the perk number (eg. “Grant Perk -32”).
Edit: There is a LW respec tool which should make testing builds much easier.
Pod Movement Is Not Random
The movement of unactivated pods is often random - but not always. I still don’t understand all the mechanics. Perhaps some of the weird behaviors I have seen are caused by bugs in the code. As far as I know, all the rules (and bugs) that define enemy pod movement have never been clearly and concisely explained anywhere.1
Listed below are what I believe to be the well established and expected rules of pod movement as most players understand it.2
On standard missions all the pods are stationary, except for one, which will move in a random direction. If the moving pod is activated, then one of the stationary pods will start moving.
The UFO command pod will always remain stationary until it is activated.
On some missions (swarming abduction, terror missions, council missions, others?) all pods are moving, and they move randomly.
On UFO missions, if you activate the command pod, all unactivated pods on the map will start moving toward your squad’s position. I refer to this behavior as Hunt Protocol.
A loose alien can also trigger Hunt Protocol. From ufopaedia:
In general, if active aliens exist on the map, aren't in retreat mode, and none of them has any XCOM operatives in sight range at the end of the aliens turn, they'll call all unactivated pods on the map (aside from the Command Pod, if any) to help them hunt down XCOM. Each unactivated pod will begin moving toward XCOMs current location inexorably, and short of retreating or being wiped out the only escape is to defeat all such enemies.
Trapped UFOs will always result in Hunt Protocol being triggered.3 from the ufopaedia:
Every enemy pod on a trapped mission has the Call for Reinforcements ability which normally only a Command Pod gets. Thus, once the shooting starts, all the numerous aliens on the map will be rapidly converging on XCOM's position; a weaker squad can easily find itself overwhelmed.
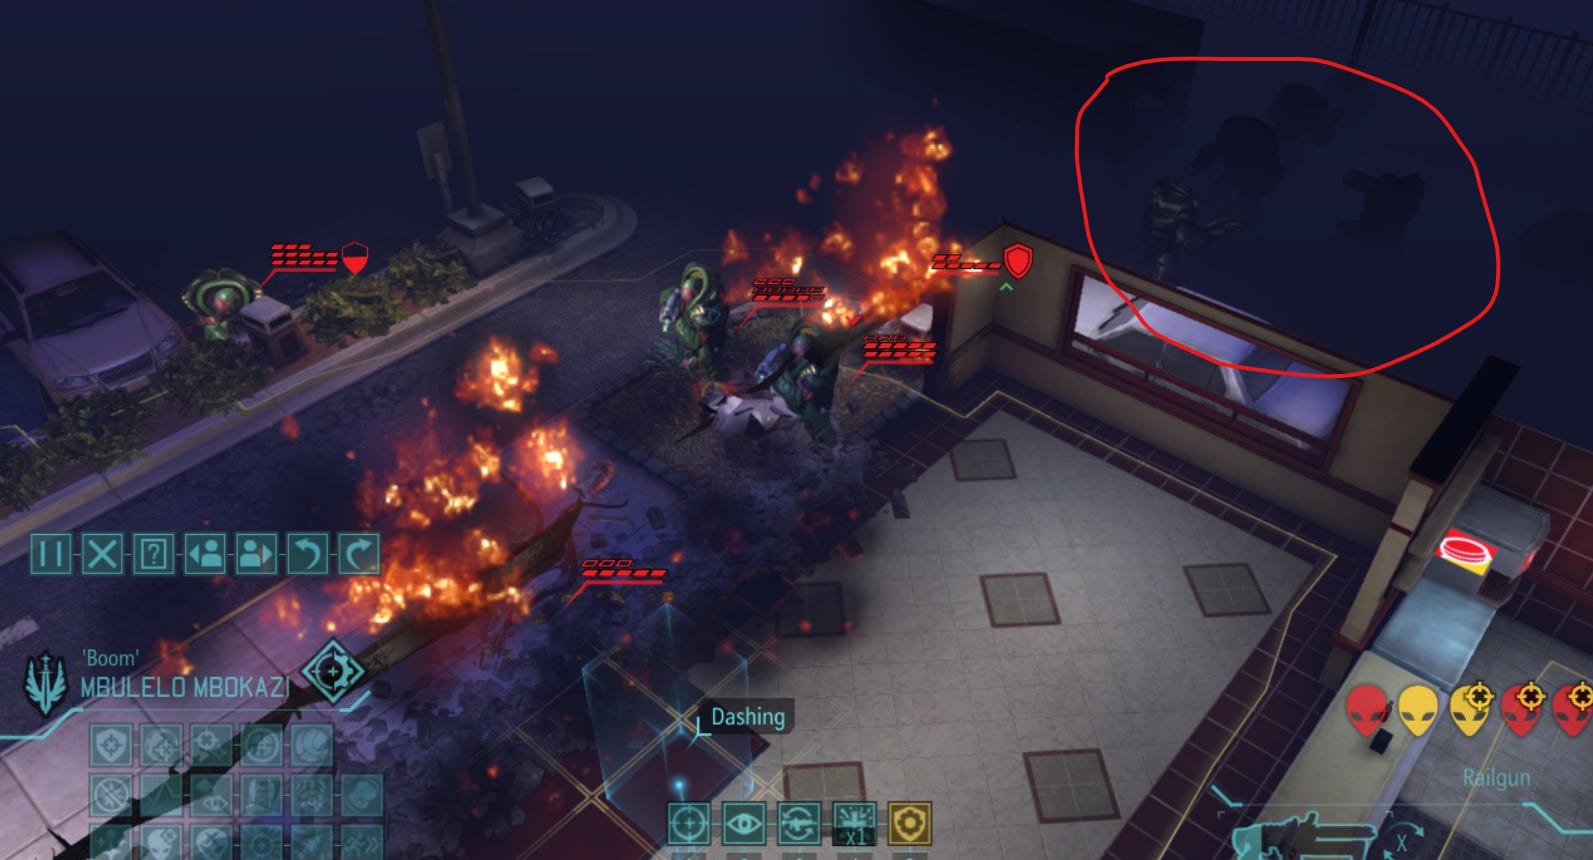
In the screen shot below I have circled an unactivated pod (6 thin men) heading straight at me. That was the 3rd pod that tried to overrun my position. Eventually every pod on the map (other than the command pod) charged my squad.

And that is about all I have found from reading online and from the comments of other commanders. It seems accurate to me, as far as it goes, but there is definitely more to it.
I have noticed a few4 other distinct patterns of pod movement that do not conform to the rules above.
Pods will sometimes hold back (Lurk):
In the image below I have circled a pod that remained outside of visual range for 4 turns while I was fighting with active enemy units.
I knew the pod was there because I had battlescanned it a few turns back, and had watched it make normal movements up until it reached the edge of visible range - at which point it stopped making full moves, and instead remained stationary or moved only 1 or 2 tiles. After I had killed all the active enemies, the pod finally made a full movement directly at my squad.
I’ve seen pods lurking outside visible range before, and I think it is pretty common - it happened at least three times in my latest campaign.5
EDIT: Another player has mentioned that there are settings in the DefaultGameCore.ini file that could describe this behavior.

Active enemies defend meld.
Recently I saw a floater double move on two consecutive turns, running all the way across the map, to intercept one of my soldiers that was heading for a meld cannister. I suppose this could just be a coincidence, but I doubt it.
Not sure if unactivated pods will also move to defend meld in the same way - something to watch for.
Unactivated pods within visible range, but behind obstructions, will move towards your position.
I don’t know at what distance this mechanic is triggered - somewhere within visible range for sure, perhaps 14 tiles? maybe even closer? I have seen it over and over again, and it is a great way to engineer a devastating overwatch trap.
Get your Meld in the Summer
Looking over my notes, I see that my best meld collection months are May - July. And this makes sense. The meld cannisters are richer in the summer months, and my squads are stronger. Summer is the time to build up a large meld reserve.
I am always greedy for meld, and so most of the time I am pushing forward with my squads, even in March and April. But sometimes I just can’t make it happen without risking my soldiers - and it’s just not worth it. Soldiers with experience are more valuable than meld cannisters, especially when my barracks is developing and I haven’t attained squad size II.
But then in May my squads get some laser weapons, and phalanx armor, a few scopes, etc. In early June I should have squad size II. Also around this time, the meld cannisters are yielding 13+ meld each, perhaps more, depending on how my air game is going. In early July I have carapace armor. This is perhaps peak power for xcom (relative to alien strength) and with this advantage, I should be able to win battles quickly, which should translate into more meld cannisters.
But it doesn’t last. By August the meld cannisters have usually diminished in value, because I am winning the air game more decisively, or because I have raided a large UFO. And by September or October they are probably down to 5 meld each.
So we need to squeeze as much meld out of summer as possible and that is why I use motion trackers, equipping two, and using leap frog movement to maximize the distance I can move safely, as I discussed in my march tactics post. It is also important to pay attention to the meld pings so you know what direction to move in.
4 Soldiers for Every Slot
Leveling up too many soldiers is wasteful. I’ve found that I just don’t use them enough to justify the effort. 4 soldiers for every slot in an 8 man squad (32 total) is a good target. My squads evolve into a 2 MEC composition (typically gunner, scout, medic, sniper, engineer, rocketeer, pathfinder, alt. MEC6). And so I like to have 4 of each of those classes, and about 9 MECs, most of which are Pathfinders. Then I need about 5-6 Assaults for Exalt missions, which I don’t focus on leveling up, as they typically serve as back ups for the primaries once Exalt is destroyed.
What if someone get’s injured or killed?
I like to have 1 or 2 extra soldiers for each class. These are the bench warmers. I level them a bit on easy missions, and they can fill in as needed when someone is injured or killed. So 6 soldiers from each class is really all I need. A 7th sniper is probably just going to sit in the barracks. Even if I lose an important soldier, I can typically make do with MSGTs from a different class.
Dealing with Itchy Trigger Tentacle
The end of summer is a good time to run an Alien Base Assaults, and these missions are tricky. They have more enemies and the maps have awkward sections. Also the enemy gets the Itchy Trigger Tentacle perk which means they can take free shots during activation. This can be really dangerous - it is possible for every enemy in the pod to get a free shot. I once saw a pod of drones take 5 shots at the soldier that activated them.
How do we deal with this unique obstacle? I used to think that the Lightning Reflexes perk reduced the hit chance of ITT shots, but that’s incorrect. It is treated as a standard shot.
Ideally, we want to activate enemy pods when they are out of visible range. This completely negates Itchy Trigger Tentacle. To make this happen we need battlescanners. And so I want the scout and engineer that I bring on the mission to have the battle scanner perk. And I give the engineer another set of battlescanners as well. There are about 8 pods on the mission, so 8 battlescanners is not too many.
To make sure I tag a pod with each battlescanner thrown, we need to use a motion tracker. And so I like to bring all three of my motion trackers on this mission. This also prevents my squad from blundering into an overwatch trap.
If I can’t activate a pod with a squadsight shot, then I want all my soldiers in cover, preferably high cover. If I know I am about to activate an enemy pod, I will often drop dense smoke before the activation rather than at the end of my turn. This can be dangerous when chryssalids and berserkers are on the map as they are difficult to kill if they reach your smoke.
Even with these precautions. soldiers are likely to get shot, so I bring extra heals. That means restorative mist on any MECs, and extra medikits as well. With the super skyranger project you get to bring 10 soldiers, so it is not a bad idea to take 2 medics. On my first ABA of the last campaign, that’s exactly what I did - I took a high ranked medic with dense smoke and a bench warmer with double medikits, and that worked out very well.
This post is followed by: Long War - Late Game Tactics.
If I am wrong about this, please let me know.
This is my understanding from having read a bunch of posts on reddit, and also from player responses to some of my substack posts, but I haven’t read everything and I have probably forgotten some of what I have read - so this is speculative.
Thanks to J2Greene for adding the info on ufopaedia, and to itstomis for pointing me to it.
previously I had 5 unexplained movement patterns, but 2 were explained away.
I’ve seen it often in LW, but it is not specific to this version of xcom - it also happens in LW2.
The 2nd MEC should be something other than a Pathfinder. I like Shogun, Valkyrie, and Jaegers. Marauders are also good.
I believe the "Hunt Protocol will occasionally happen for no clear reason." section is because those are trapped UFOs
From https://www.ufopaedia.org/index.php/Threat_(Long_War) :
Every enemy pod on a trapped mission has the Call for Reinforcements ability which normally only a Command Pod gets. Thus, once the shooting starts, all the numerous aliens on the map will be rapidly converging on XCOM's position; a weaker squad can easily find itself overwhelmed.
Interesting. I have played quite a few campaigns and never had a battle scanner activate a roving (or stationary) unactivated pod. If not a bug, I am wondering if what you experienced is some parallel mechanic. For example they definitely know where a concealed scout in sight range is, they just can't attack until the stealth is broken in a flank, which they will move to do. Did you perhaps have concealed scout nearby? As for ITT... I don't use the Second Wave option, but as you say it is active anyways in ABA (and Gangplank for the boss disk, if you play it), but my experience is that LR does protect against ITT (although as soon as it's available, I also equip the scout with a Chameleon Suit, making subsequent shots also much more likely to miss on activation) - hence I always start move with a Low Profile scout moving into a position as a half-move, allowing the rest of the squad to move into whatever positions provide cover while counterattacking. As always, thanks for continuing to share your experience and thoughts.